By: Sam Korthof on Oct 21, 2016

When it comes to communications, one of the most efficient ways to communicate is visually. Just like the saying, a picture is worth a thousand words, so is a screen capture.
Here at Byte we have many uses for screen captures:
1. For visual explanations of what is occurring on a website
2. To communicate the information quicker than sending/ uploading an actual file
3. To compare a before and after
Screen captures work out great for our Issues System in the ByteCMS. When a client needs assistance with their website, and has trouble explaining their needs in writing, we recommend that they send us a screen capture. Having a screen capture to reference will pinpoint us to the exact location on a website, so we do not have to go on a scavenger hunt based on the clues in the issue. Instead of spending minutes being unsure or confused as to where to go, and possibly going to the wrong page/s on the website, the screen capture will lead us directly to where we need to go, all within seconds.
Below are the steps to create a screen capture:
(Make sure your screen is displaying exactly what you want to display in the screen shot)
For Mac Users:
|
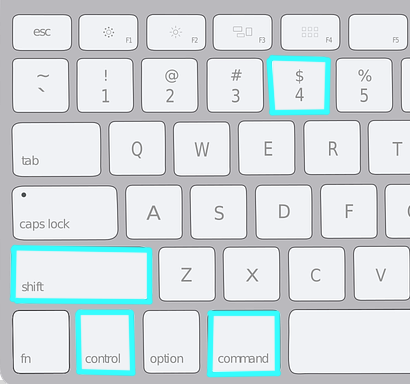
Screen capture a certain portion of your screen and save it to your clipboard (saves screen capture to memory and allows you to paste the image right away) 2. Let go of those keys, and navigate with your mouse to the area of your screen you want to be in your screen capture. (Your cursor will turn into a crosshair) While holding your mouse down, click and drag around that certain area of your screen to form a bounding box. Once your bounding box is formed, let go. 3. Navigate to where you want to send your screen capture. (In the ByteCMS Issue you can paste your image in the comment field of the issue) 4. On your keyboard click: Command + V (this will paste your image) |
 |
|
Pro tip! How to create a simpler shortcut for your screen capture: 1. Navigate to System Preferences 2. Click the Keyboard icon 3. Click on the Shortcuts menu 4. Click on Screen Shots 5. Read through the list of existing shortcuts 6. If you see a shortcut you would like to change, click the key combination and type in the new keys. 7. At Byte we set the "Copy picture of selected area to the clipboard" to Command + 3. |
|
For PC Users:
|
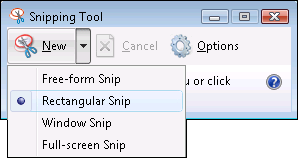
A. Using the Snipping Tool Program, screen capture a certain portion of your screen and copy/ paste How to open the Snipping Tool for Windows 10 Users: 1. Click on the Search/ Magnifier Glass 2. Enter Snip 3. Click on the Snipping Tool Icon How to open the Snipping Tool for Windows 8 Users: 1. With your mouse, open the charm bar by putting your cursor to the top right corner of your screen 2. Select the Search button 3. Make sure Apps is selected and in the search input type "Snipp" 4. Start the Snipping Tool by Clicking the Icon How to open the Snipping Tool for Windows 7 Users: 1. Click the Start button. 2. In the search box, type in "Snipp" 3. In the list of results, click "Snipping Tool"
2. In the Snipping Tool Menu, click the New Button 3. In the list of items, select "Rectangular Snip" 3. Navigate to the area on your screen you want to capture 4. You will see your cursor turn into crosshairs. Click and drag with your mouse to form a bounding box around that area 5. In the snipping tool menu, you will see your screen capture image appear. 6. To copy your snip and paste it elsewhere, select the Copy Icon (next to the save icon) 7. Navigate to where you want to send your screen capture. (In the ByteCMS Issue you can paste your image in the comment field of the issue) and on your keyboard click: Ctrol + V to paste |
|
|
|
|
|
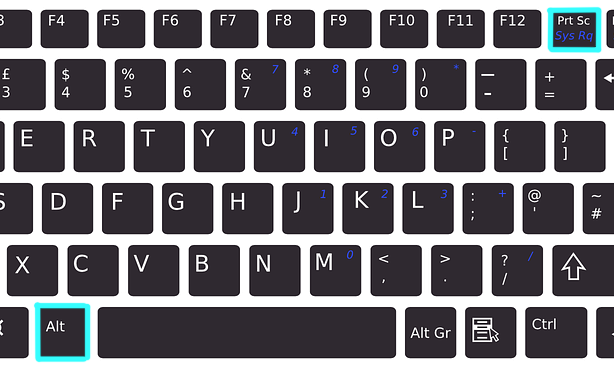
If you can’t use the snipping tool, try this: B. Screen capture just the active window and save it to your clipboard (saves screen capture to memory and allows you to paste the image right away) 2. Navigate to where you want to send your screen capture. (In the ByteCMS Issue you can paste your image in the comment field of the issue) 3. On your keyboard click: Ctrol + V (this will paste your image) |
 |
Pasting the image into the ByteCMS Issue:
Paste (control + v) the image in the area that is highlighted
.png)


